I've had a spurt of learning recently in the realm of technology. My colleague and I, with the expert guidance of our very tech-savvy librarian, recently taught our students how to use Google Drive to save files. They are beginning to work on their science fair projects, and we reasoned that the Google Drive account would result in fewer tears over lost USB drives.
While poking around my own personal Google Drive account (which I had previously never used), it occurred to me that the "Form" option could result in an online test. My 8th graders learned some biology in 6th grade when I wasn't their teacher. In 7th grade we don't teach biology at all, but in 8th grade we do. I know what their 6th grade teacher taught them, but I wanted to see how much they remembered.
With that purpose in mind, I started to design a simple cells pre-assessment. I checked out the school's iPAD cart in order to have all my students take the pre-assessment. I explained to my students that this pre-assessment has two goals: it will show me what they remember from 6th grade, and it'll help me learn how to use the Google Form feature for the future. I'll walk you through the steps I used to create a self-grading pre-assessment using a Google Form so you can try this yourself.
Step-by-Step Instructions
Google Drive allows you to create a variety of files: Document, Presentation, Spreadsheet, Form and Drawing are the default options. To use Form, click Create, and then choose Form. You'll notice in this picture that I have already made a copy of my original Cells Pre-Assessment and I've begun to modify it to make it better.
You'll also notice in the picture above that there is a Cells Pre-Assessment Form document, and a Cells Pre-Assessment (Responses) spreadsheet. When you create a new form, there is the option of choosing a "response destination" which is how you make the spreadsheet that collects the responses. Since the name of this new form I made is "Cells Pre-Assessment" the default name of the spreadsheet is "Cells Pre-Assessment (Responses)." I recommend naming your form before choosing a response destination so that they match.
Below you'll see a screen-shot of part of the pre-assessment, as seen in my Google Drive account.
(I added my name and my school's name to the form directly below the title, so that my students would know they were at the correct web-page, but I blurred it for privacy)
This next picture is how it looks to the students when they are taking the test online. I used one of the themes that Google Docs offers.
This next picture shows the Spreadsheet (Google's version of Excel) that collects the results automatically. You'll notice that the cells are rather text heavy, since they display the entire answer that was selected. The tech-savvy math teacher across the hall and I have been brainstorming a way to make it just show A, B, C, D (for a multiple choice question), so that the data is easier to look at in the form. More on that once I figure it out. For now, I can see all of my students' answers, along with their names and class period (since I made the first two questions "name" and "class period"). As a side note, I used the option for each question to make it required, so that I wouldn't have to deal with "Johnny forgot to answer question #6, so I don't have data for that answer".
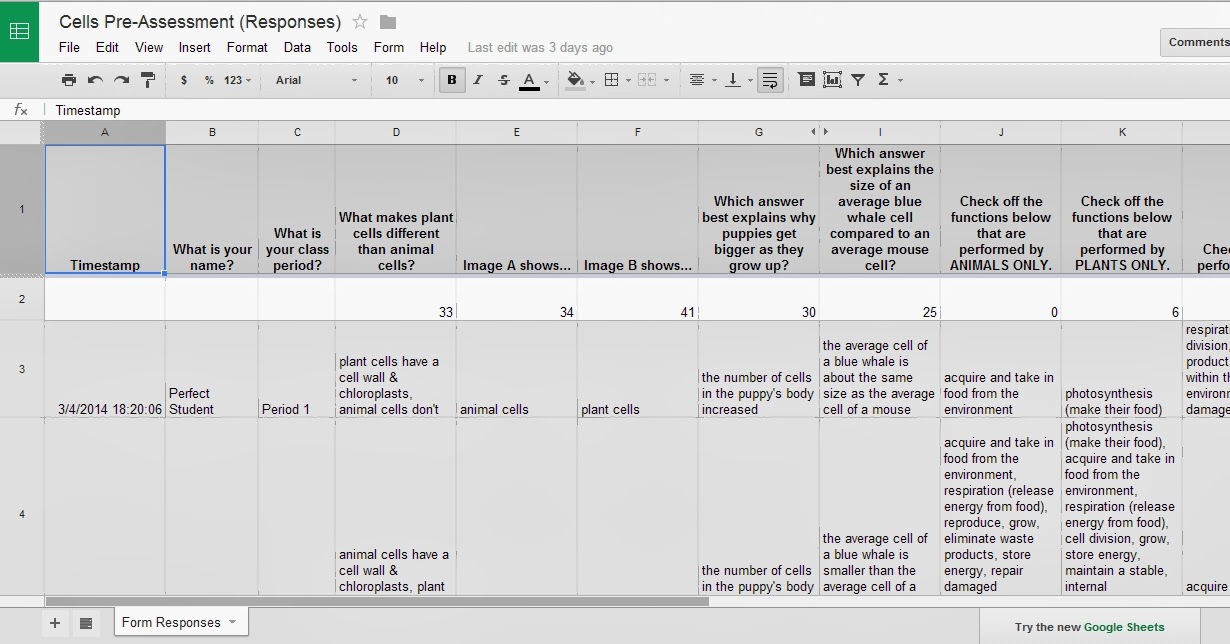
The next hurdle was how to input a formula that would show me how many of my students chose the correct answer for each question. Since this is a pre-assessment, I wanted to see at a glance if there was anything I didn't need to spend time teaching, or if there were other things that needed more review.
Notice in the picture below that for the question "what makes plant cells different than animal cells?" there is the number 33 in the cell above. I tested 46 students, and 33 students selected the correct answer. The formula for that is visible in the picture below. That formula is:
=COUNTIF(D4:D50,"plant cells have a cell wall & chloroplasts, animal cells don't")
What that means is that I'm telling the program to count how many cells between D4 through D50 contain the answer "plant cells have a cell wall & chloroplasts, animal cells don't." When I figure out how to have the form display just A, B, C, or D, I can change the formula to be:
=COUNTIF(D4:D50,"A")

The next picture shows how I used another formula to find out how each student did overall. The first entry is from "Perfect Student" and is my own answer key. Since I was the first person to take this assessment, those answers are shown first (the Timestamp field helps to display the answers in chronological order). The formula compares each students' answers to the "Perfect Student" row. The formula is:
=IF(D4=$D$3,1,0)+IF(E4=$E$3,1,0)+IF(F4=$F$3,1,0)+IF(G4=$G$3,1,0)+IF(I4=$I$3,1,0)+IF(J4=$J$3,1,0)+IF(K4=$K$3,1,0)+IF(L4=$L$3,1,0))
The formula literally says, if the contents of D4 match D3, give the student 1 point. If the contents don't match, give the student 0 points (and so on for column E, F, G, etc). The $ signs ensure that if the Perfect Student's row changes for some reason (as it did when I inserted a row above to count for each question separately), the document knows that and will adjust accordingly. You can change the point amounts as you see fit.
And lastly, since I was going to need to have each student type in the URL for the pre-assessment, I decided to use
TinyURL to make a much shorter URL. That way not only would access be quicker, but there would be fewer problems with students typing in the URL wrong and getting frustrated.
So there you have it. There are many disadvantages to this approach. I need the iPAD cart, or a free computer lab if I want to give another online assessment. In order for the automatic scoring to work, the questions need to be multiple-choice. However, there are many advantages as well. I am a terribly slow grader, and as a result it takes me much too long to return an assessment. I see this technology being useful for daily (or weekly) exit tickets. I wonder if I could utilize students' personal cell phones and/or tablets so that I wouldn't encounter the barrier of waiting for the iPAD cart or the computer lab to be free.
If these instructions are helpful, and you end up using Google Form to create an online assessment, please let me know. I'd love to learn from you.